Monday, November 9, 2009

Sushi Cupcakes


On one of the blogs I follow (Not So Idle Hands ), one of her other followers made cupcakes that looked like sushi (sorry, I don't remember whose it was, otherwise I'd link it). I checked into it, and found that even more people did this as well. So I took ideas from everyone and made my own sushi cupcakes. I actually did them for my friend's b-day-I needed an excuse to make and share them. ;)
I had to buy myself a mini muffin pan, so I better make sure to use it and get my full $4.50 worth. ;)
I made my minis and waited for them to cool completely, which didn't take long since they're so small.


I cut off the tops and wrapped the stems with fruit roll ups. This seems to be the common thing to use. Some people use fondant or use green baking cups. My kids just ate the tops as they were but I thought of something to do with them the next time. That will be another post, though. ;)
I kept the containers from sushi that we had. (For some reason, Blogspot rotated my pic during the upload, and I can't figure out how to rotate it back.)
I topped it with white sparling sugar (white jimmies were preferred but I couldn't find them in the stores) and cut up pieces of gummy worms (any gummy candy will do) for the middle. The "wasabi" was made from green tinted icing. It looked a lot more like real wasabi than what the pic shows. I don't think they turned out too bad for my first time making them. They were so yummy! My friend and her family loved them!

Tuesday, October 27, 2009

Gabi's Candy Land cake

For Gabi's third birthday, we had a Candy Land party. To take some of the stress off of me, I ordered a plain (no frosting) marble cake from the Walmart bakery. I decorated it myself, which was time consuming but a lot of fun. Since Gabi's birthday is after Halloween, I was able to get a lot of candy very cheap. I tried to make a cake as close as possible to the game board. I'm sure most people can do a much better job than I did, but the cake was a hit, none the less, among kids AND adults.


On this part, I used an older version of the game where "Queen Frostine" (who has now been demoted to princess) ice skated on the ice cream sea. So I added some blue food color to white frosting, then dropped colored marshmallows to hopefully look like scoops of ice cream.
I used tropical flavored Starbursts as the game spaces. I made gingerbread cookies for the party also (one of the activities was for the kids to decorate their own ginger bread boy or girl) so I hand cut a tree shape out of some leftover dough. From a newer version of the game, Plumpy is replaced by the gingerbread tree and used purple skittles for the plumbs or whatever grows on the tree. I also used Skittles and a rainbow fruit rollup for the rainbow pass. The peppermint forest is pretty self explanatory. I used different sized spicedrops for gumdrop mountains and gumdrop pass.
On a newer version, licorice castle is replaced by licorice forest. So I took some string licorice and peeled pieces down about halfway, making trees out of them.
Next is peanut acres (formerly Peanut brittle house). I just used bite size Nutter Butters.
Lollipop woods was very easy with various lollipops.
Then it's the Ice Cream Sea which is now snow flake lake.
Molasses Swamp is now Chocolate Swamp. I used Sugar Daddys for the plants or whatever grows out of the swamp. I make Gloppy by stacking a couple bite sized Reeses cups and covering it with chocolate frosting.
The Candy Castle was down with a colored ice cream cone, Necco wafers, and candy from different parts of the game.
Last but not least, I made the older version game pieces (gingerbread men) out of colored fondant, and a toothpick to hold it in the cake.
Gabi loved her cake and everyone had a blast!
(Not pictured)
When people first arrived, they each got a bag that they decorated with gingerbread house stickers that I ordered from Oriental Trading Co. They also got gingerbread boys and girls to decorate with real icing. Since Gabi was still too young for party games, these took place of the games (otherwise I would have made a lifesize version of the game for people to play). We had Candy Land, the movie, playing on the TV. Everyone got some cool candy plus candy from a pinata. All the kids were on a massive sugar high when they left. My intent was to have a toothbrush in each bag, too, but I forgot. Oh well, it was good. I'd like to do that theme again, if I can. This year, Gabi's theme is a Mad Hatter Tea Party. I wonder what kinds of things we'll come up with for that.

Sunday, October 18, 2009

The Perfect Brownie Pan Set


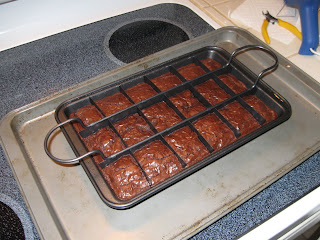
I bought this brownie pan a few days ago and just tried it out last night. I originally wasn't going to buy it and even resisted temptation last week. But this week, it was beckoning me. I tried to resist once again, but then I rationalized that if I buy this, we will get our $20 worth, with all the holiday baking I plan to do, so I bought it. I tried it for the first time last night and must say, it was super easy and the brownies, somehow, tasted to much better than they usually do. They were fantabulous!
Above and right below are before baking. I wasn't sure, but you do actually bake with the divider in the pan

After they're baked, take the divider out...
...then set the pan on a stand that pops the brownies out. I should have taken a pic of all that comes with it. There are stencils you can use to make designs with powdered sugar, too. Wow, if I ever have to contribute to a bake sale, I know what I'm making! =P

Glowing jack-o-lanterns


I recently started doing this blog and posting things I've done in the past but, my BFF from ELM ST has been sharing some of the blogs that she follows, that she thinks I'll enjoy. She sent me the link to Not So Idle Hands because I had recently been going chalkboard paint crazy and making labels to put on glass jars and plastic containers. And this blog had done the same but with bookmarks and gift tags (very cute and very clever, I might add). While looking through her site, I came across some things in her "Freecycle Friday" section, and absolutely fell in love with her glowing jack-o-lanterns. Well, I had to make some myself and this is what we have. I didn't have a big variety in the size jars on hand, but I didn't want to wait to get more. The mummy didn't come out as I expected, though. I tried black tissue paper under the white, but then wrapped too much white over it in one area. Oh well. It was a learning experience. I want to make more. So a big thank you to Michelle for sharing and being the bestest friend in the world and Emily for having fabulous craft ideas! Happy Haunting!

Saturday, October 17, 2009

Skullholders


I don't know why the pic posted sideways. Anywho, I got this pattern from Stitch 'n bitch crochet. I've made the set twice,the first going to my SIL and the second to my FIL (for one of his coworkers). It's pretty simple and if not stopped every few stitches to be asked for juice, food or a certain DVD, I could get this done in a day.

Halloween past

Last year, my friend and I planned an awesome Halloween party. Unfortunately, we planned it the week before Halloween (thinking it'd be better for people with kids). Something happened with her FIL, so her husband went on emergency leave. We were having the party at their house, and everyone that was invited, worked with our husbands. So when they heard he had to leave, they assumed the party was off...and no one showed. We had put so much time, money and energy into that party. So we swore to never throw a Halloween party again. Well, my husband and I are throwing one this year but, we're not having all the games and prizes that were planned for last year. And we're not supplying all the food like we did last year. But I do want to show a few of our treats.

The pumpkins were going to be part of a carving contest. My friend made the "ghoul hands" which were quite tasty. Then of course, we HAD to have caramel apples. Not pictured were popcorn balls, mummy weenies (smokey links wrapped in strips of pastry dough to look like mummies), ghoul punch (had a frozen hand floating in it), among many other regular snacks.


These are supposed to be peanutbutter eyes balls. I know they don't really look like eyeballs, though.
Here are the skullcakes-shifted on the drive over. I think next time I'll use black licorice lace or something else for the teeth.
We had several games for people to play, which they would receive a sealed envelope that they couldn't open until it was time. That would be after all the games were played, we'd have a blind prize auction. Inside the envelopes were different amounts of play money that they could use to bid on prizes. Some were really cool, others were gags. But they didn't know what they were bidding on. We would tell them if something was for a male or female or adult or child. I really think it would have gone over well. Maybe sometime in the future, we'll plan for that again.

Chalkboard paint


I bought this paint awhile ago. I planned to use it on plastic containers that I stored my kids toys in. I could then write on the containers. I was thinking of other things to use the paint for. One thing I love about my MIL's house is she has everything stored in glass and plastic containers. I decided to start doing that, too. IMO, when things are stored out in the open, they look better in glass and plastic containers. Even though you can clearly see what most of it is, I thought it'd look cute to have chalkboard paint and label everything. So this is my first attempt. Oh ya, I painted mini pumpkins, too. Thought it'd be fun to draw faces on them. I saw it in Parenting magazine, or something like that.
After going through the hassle of painting on glass, wiping up drips, taping an area off just to have all the paint come off with the tape, I finally had a better idea. I painted sticker labels, then cut the edges with scrapbook scissors. I think it looks a lot better, and so much easier!